Part 2
Where we are - the Display program
The first part of this article showed how to collect the position data, but now its time to find a way to plot the data on a map.
What I need is a device to store the RS232 text lines. One option is to carry around a portable PC along with the rest of the system. That makes quite a large and heavy unit, which I do not want, so I looked for a different way to make the logger.
Capture the GPS data
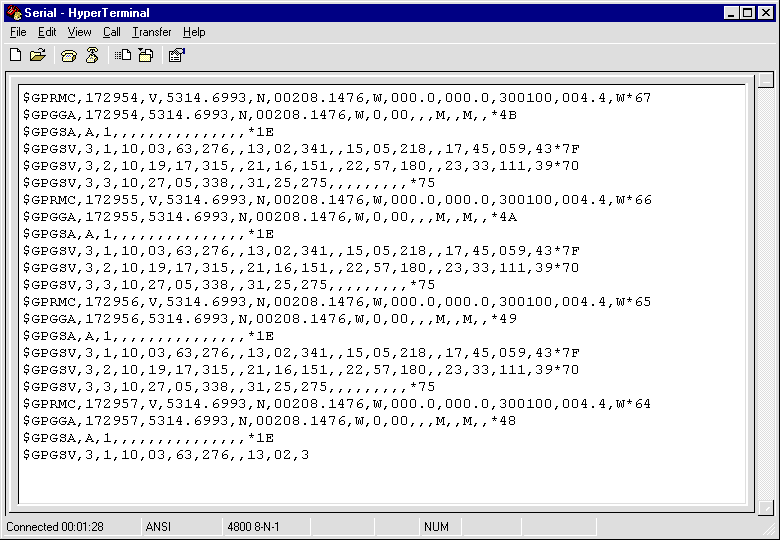
First I can use Hyperterminal to capture the data from the Rabbit board. The capture buffer can be set to save to a file from the Transfer/Capture Text menus, or you can mark text and use Copy and Paste to transfer the screen contents. Using a file means you don't need to bother with real time collection of the serial data, which makes the display program a lot simpler. It also makes testing easier, since the data never changes between test runs. See Figure 2.
Plotting
Next I need a program which plots Latitude and Longitude data.
There are several ways to do plotting from the code of a program. In Windows programs it is possible to use almost any rectangular window, picture box or text box as a canvas to draw points on. The big problem is in managing the data, which makes up the plotted points. The code of the program must handle repainting the screen when another window covers the map and then uncovers it again. There is quite a bit of code in handling all the niceties, so to get things going quickly I chose Delphi and its TeeChart graphing component to do most of the work. Almost all versions of Delphi include TeeChart, but you will have to look around the components for it. In my Delphi 5 it is on the Additional tab and labelled as Chart with an icon which looks like some kind of pie chart. Its a very good component but not well documented.
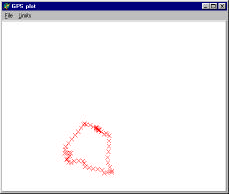
TeeChart is designed to plot data so all I need to give it is the X-Y coordinates of the points collected from the GPS. It deals with all the Windows bits. The maximum and minimum extents of the graph axes control the magnification of the plot. I set them to show the largest plot I can get. [Figure Figure 2 - Hyperterminal screen with GPS data. 3 - raw position plot.] Its worth watching out for the East West axis which on a graph increases from left to right, but the GPS data is in degrees West, which increases from right to left. Again the graph plotter component allows selection of an inverted X-axis to correct this. The North South vertical axis is OK since it increases from bottom to top, which is the same as the degrees North from the GPS data. If you are in the Southern Hemisphere the plot axes may need to take account of latitude in degrees South, which needs an inverted Y-axis. There are several choices in the GPS receiver which can achieve the same inversion of axes, for example, degrees East. You must learn how to program them though.
The plotted data looks good, and it looks like the track of my route, but it would be much better if it were superimposed on top of a map. Then I could see just where the data leads. First I tried to plot the graph on paper. Getting the scaling to match a map correctly is almost impossible and unless I use clear film, the map cannot be seen very well. I guess the best result for me would be to use the PC program to plot the position onto a map on the screen. TeeChart allows a background picture, which acts, as a background to the plot, so what I need, is a map image to put in it.
It's possible to scan a map and use the image as a background for the plot. I tried this, but maps are quite large and getting a good scan with no creases and also well aligned is difficult. I could do with another solution. So looking through my old cover disks from the computer magazines I found a couple of programs, which show maps of Britain. These give quite good looking images when they are zoomed to maximum, so I decided to try and use one. Although some allow the GPS data to be fed directly into the program that is not much use to me, since I have collected all the data before hand. So my thoughts are back with the idea of a background image with my own program. The simplest thing I can do is screen capture the map as a BMP file and load that into the graph plot program. This is OK but only if I can calibrate the map against the graph plot extents. Several of the programs will not show the co-ordinates of the mouse on the map, but fortunately the AA Milemaster 99 version 2 does, and it is on the July 2000 cover disk of PC Plus magazine.
First zoom the map to cover the area of interest, then screen capture the image. I use Paint Shop Pro's capture but there are many other ways to do this including using the Print Screen button on the keyboard and then pasting the screen into the Paint program which is part of Windows. The whole screen image contains more than the map picture, so use the selection tool to draw a rectangle around the map image and use Copy to... on the Edit menu to save it to a file.
Now we have the image of the map, but we must get the co-ordinates of the corners of the image to do the calibration. I use the mouse to slowly approach the corners of the map in the Milemaster program. At the bottom of the screen a set of Latitude and Longitude co-ordinates show the mouse position. It is interesting that the projection of the map is not rectangular. For instance the X co-ordinate of the bottom left corner is not the same as the X co-ordinate of the top left corner. I guess the exact map projection depends on the mapping program, and we don't really know what it is. By collecting the co-ordinates of all four corners we are in a position to allow some corrections for these differences.
The other piece of work the program does is decode the file of GPS NMEA sentences. Only part of the $GPGGA line is used. The program scans along the line looking for the Latitude and Longitude parts and plots them as a cross on the graph. If you use the program with your own data, make sure the data is output to the file as degrees minutes and decimal minutes. GPS receivers can be set up to give different data formats such as decimal degrees, which would still be read but produce unusual plotted points. You should also note that for the plot to match the map, the map image needs to just fill the graph window. Achieve this by pulling the edges of the program window to show just the complete map image.
Collecting the 'Live Data'
Now I have a system to collect position data from a GPS receiver. It uses the Rabbit module to save a position just every 30 seconds or so, and a PC program which shows the positions overlaid on a map. But I needed a route to check the whole system was working as expected.
Running the GPS module on the table inside my house limits the number of satellites in view and although it sometimes saw three or four satellites through the window, this seemed to only happen at 9:30pm for about 30 minutes! Not very satisfactory at all, so I decided to car mount the system so it could be taken for a drive.
Power becomes a problem. The mains power supply in the house isn't available in the car, only the 12V of the car battery. I should be able to access this 12v from the cigarette lighter, and having a collection of cigarette lighter plugs made me think it would be no problem. But alas none fitted my car. It was news to me that there are so many variations.
Not wanting to wait for a new plug to arrive, I examined my alternatives. Both the GPS and the Rabbit have voltage regulators, which work to give 5V. If I can provide, say at least 7V, the regulators can provide the stable supplies. So what power do I have available? Rechargeable batteries fitted into a battery holder seem a good choice. The holder carries eight AA cells, which gives about 9.6V, so it should work. A quick test needed just a few wires and proved effective. The next question is will the battery last long enough? Well the batteries are 600mA hour cells, and the GPS together with the Logger use about 300mA between them, so I should get about 120 minutes from a fully charged battery pack.
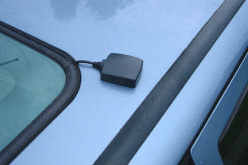
That sounds good so I put the batteries in the charger to get them ready. In the mean time I checked the car to see where the antennae could be fitted and still allow the cable to enter the vehicle without leaving a door open. For the first time I found a reasonable use for the sunroof. You may guess that I don't like sunroofs. They usually give me a burnt head and make a lot of noise when moving. But back to the antennae, which sticks magnetically to the car roof just outside the sunroof. The cable drops down onto the passenger seat where the GPS module and logger can sit in a plastic crate. [See Photo 4 - Antenna on the car.] I haven't packaged the parts properly because in the end I want a hand portable or back portable system to use when walking, but I need to work out a suitable power supply for the system first.
All the elements are ready so I plugged in the battery power and went for a drive round a set of roads, taking about 20 minutes to complete. The LEDs flash regularly showing the logger is receiving and storing data. Off I went. Everything worked well until about 100m from the end of the run when the LEDs stopped flashing and one stayed on. What's gone wrong? When I measured the battery pack the voltage had dropped below the reset voltage of the Rabbit board. Not wanting to give up, I changed the batteries and tried again and once more the batteries failed just as I finished the journey! This wasn't going to work, and I needed a new idea.
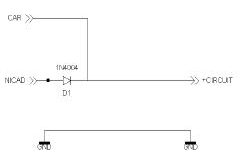
Car cigarette plugs are quite expensive when you look at the prices in the catalogues, but I recalled seeing many cheap mobile phone car adapters in the local shops. Off I went to see if I could get an adapter for less than a new plug. My luck was in and I bought a suitable plug with phone adapter for £5. I pulled the plug apart and rewired it to provide 12V to the circuits. That got me going in the car. To get the circuits back into the house I needed to keep the power supplied. A diode, [See Figure 4 - diode circuit] and the battery pack attached through a plug in connector, allows me to run the equipment either from the car battery or the rechargeable battery pack. The battery pack powers the crate so I can carry it indoors to unload the data into Hyperterminal.
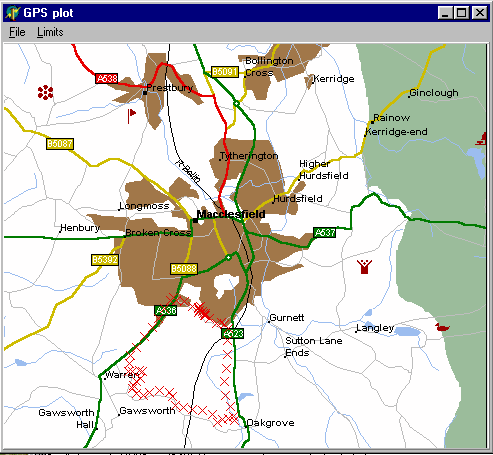
So with the system set up in the car I drove round the test route on roads just south of Macclesfield. The power held out this time and at the end I used the battery to carry the logger to the computer. The plot on the computer screen is shown in Figure 5 (route plot on map). The GPS track doesn't lie on the road. It is close though. This data was collected before selective availability was turned off. There is also a question of how accurate the map is when it is fully zoomed. I also guess my understanding of GPS datum´s is not good, but at least the track shows on the map and is within 100m or so of the road.
Summing Up
Well there is the complete project from logging the data from the GPS to plotting it on the screen of the PC. When I first started the project a GPS module was the cheapest way to get going but now there are complete GPS units like the eTrek which include the antennae and its own battery power. You can sit the eTrek in the car window and it receives satellite signals very well. Also the plotting software needs improving to better match the GPS Latitude and Long data to the map co-ordinates. Give it a go for yourself, though.
Where to get things
- A version of Hyperterminal can be downloaded from http://www.hilgraeve.com/ or you can buy an enhanced version from the same address. It may also be on your Windows CD-rom.
- Software for this article is available from http://www.DrRich.co.uk/
- Rabbit 2000 kit http://www.rabbitsemiconductor.com/
- UK supplier of the Rabbit development kit.
2001 - Web: http://www.2001elec.co.uk
Impulse Corporation Limited, Unit 2 Littleton Business Park, Littleton Drive,
Huntingdon, Staffordshire WS12 4TR.
Web: http://www.impulse-corp.co.uk/
Email: sales@impulse-corp.co.uk - Garmin GPS information from www.garmin.com


